Before we get started with our tutorial, let me make a few announcements:
(1) There are some left out bits in the recipe as written. Orange zest is in the ingredient list but there's no instruction on what to do with it. You just lump it in with the other stuff (I'll tell you when in this tutorial). My apologies for that total mind burp. However, you can leave it out if you like. It's just a matter of bringing a little brightness to the proceedings.
(2) In the instructions there's something that's not listed in the ingredient list: Prosciutto. It's mentioned in the instructions, though. It's one of those "where the hell did that come from" moments. I hate those. You need about 16 slices of prosciutto to assemble these wonderful morsels. I apologize again.
(3) And I apologize in advance for any typos. I'm eating one of these while writing and the combined juices of the innards and the buttery of the crust is making slippery work of the keyboard. I'm not complaining.
The first thing you'll want to do is make a batch of Traditional Puff Pastry per the instructions in the book. You'll need 1/4 of that batch.
 |
| I even measure! How fancy. |
 |
| Strips of parchment 4" tall and cut in half to line the muffin cavity! |
Next, you'll want to assemble your kit: If you are using small cake rings, put 8 of those on your parchment lined sheetpan. If you are using a muffin tin, put that on a parchment lined sheetpan and cut strips of parchment, 4 inches tall. I cut it from the length of a half sheet of parchment and find that cutting that strip in half is enough hangover per the directions.
 |
| Bottoms rolled to the right depth! |
Roll out the puff rounds for the bottom (6") and top (3"). This is just enough puff to make this recipe (8 pork pies). You'll have to roll rather thin. This accomplishes three things: (1) It makes the dough thin enough that you make room for the layer of prosciutto, (2) it allows the entire pie to cook through in a decent amount of time without charring the dough, (3) it leaves room for all the filling.
 |
Pile left over scraps and refrigerate. Then roll out to stamp out the tops.
|
 |
| Who you calling a vent hole? Tops are rolled out and vented! |
If you aren't the most efficient dough roller and find you can't stamp out the tops and bottoms when you first roll out the dough, layer the left over pieces on top of each other (don't smush together) and refrigerate for 20 minutes. You have time for this since you'll be freezing the bottom bit of dough anyway. Then roll the scraps out and cut out your top pieces.
For making the pork pies in the muffin tin: center the piece of parchment over the cavity you are using. Center the dough round on top of the parchment.
 |
| Parchment over the cavity. Dough on top of parchment |
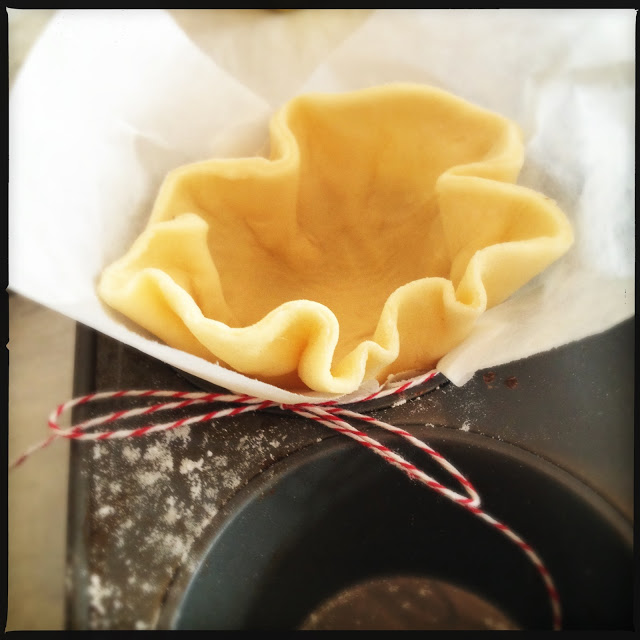 |
| Gently press the dough into the cavity to form a cup and use a piece of kitchen string to wrap up the parchment along the sides of the dough to keep them standing up straight! |
 |
| If you're using small cake rings, line the ring with the dough. It's a neater presentation but there's something charming about that little parchment bundle with the bow. |
 |
| Dock the bottom of the dough and freeze the bottom crusts for 20 minutes. |
 |
| Line the frozen dough with parchment and fill to the rim with pie weights. Blind bake for 15 minutes. |
 |
| Remove the weights. You'll notice the dough looks wet. Put back in the oven until the dough loses that raw dough sheen, about 5 minutes. |
 |
As this is puff, it will puff a bit once you remove the weights and bake again. Gently press down and around the sides to deflate it a bit.
|
 |
| Once cool, line the bottoms with a few pieces of prosciutto. It may take up to two and the damn ham tends to tear. But not to fear. Just use the jagged pieces to line the bottom and top. This creates a tasty barrier that keeps the juices of the filling contained. |
Now we can make the filling. 1 pound ground pork shoulder, 1 pound thick cut bacon diced. And other tasties, including that darn orange zest. You place half of the shoulder and half of the bacon in a food processor along with the additional ingredients: Worcestershire, mustard, salt, ZEST, anchovy paste, thyme and white pepper. Pulse until well combined and add back to the remaining meat and muddle it all up well.
 |
| Some of the ingredients...but where's that ZEST? OK. Leave it out if you want. I did today. |
 |
| Fill those cavities! Press press press. They can mound a bit if you like but not so much that the juices will flow over the side. You can tuck any overhanging prosciutto over the filling or trim. Up to you. |
 |
Top your little pies with the vented top round, brush with egg wash and then sprinkle with salt.
|
Bake at 400º for 20 minutes (CONVENTIONAL!) and then turn the heat down to 350º and bake for 40 minutes more. You may get some juices running out onto the sheetpan. That's ok. That's why you have a sheetpan there, to catch the juices.
 |
| She's cute! It looks like she has a little skirt on. |
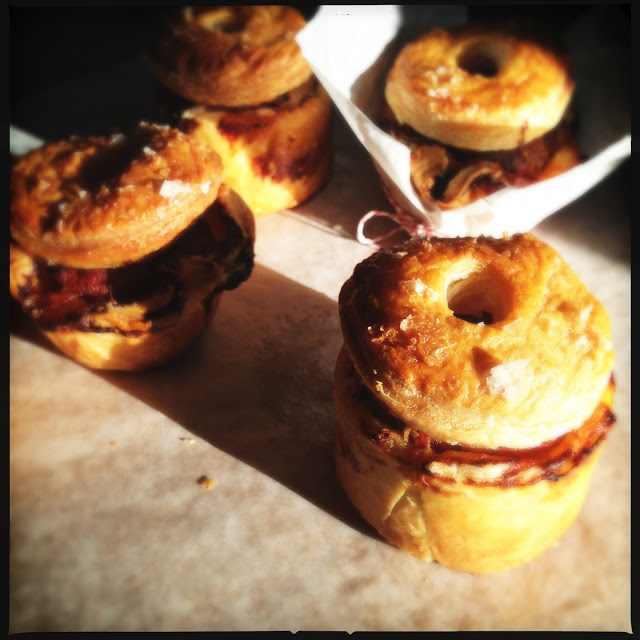 |
| The whole family. |
 |
| I'm not going to lie. When everything's done baking, the paper and ribbon on the muffin pies are going to look awful. But if you love the idea of a little package of pork pie with a bow (and who doesn't) just make extra pieces of parchment & string and swap them out for the "baked on, caked on" bits when everything's cool enough. |
 |
| Nothing beats baking in a cake ring. This little guy stand at attention! |
Let's pretend that the idea of lining tins and rings and topping and venting is getting you down. Here's an option! Roll out puff into a neat rectangle. Brush the sides with egg wash. Line the dough with a thin layer of proscuitto, leaving about 1 inch along the edges empty. Pile some filling on one half of the prosciutto.
 |
| Fold over, crimp and vent. Bake just like the recipe says. |


